
cloud-init入门
cloud-init最早由Canonical公司开发,初衷是解决云计算环境中ubuntu实例的自动化配置问题。随着云计算的普及,cloud-init的功能不断扩展,逐步加入实例启动时自动执行一系列配置任务,例如设置主机名、配置网络、安装软件包等,并且支持更多的配置操作和更多的Linux发行版,诸如Fedora、Debian、CentOS等,也开始集成cloud-init作为其云镜像的一部分,成为云平台中实例初始化的事实标准。
在cloud-init未出现之前,也有一些工具和方法用于自动化配置和管理服务器和虚拟机实例,比如
- Kickstart是Red Hat系列发行版(如RHEL和CentOS)用于自动化安装系统的工具
- Preseed是Debian和基于Debian的发行版(如Ubuntu,Mint)用于自动化安装的工具
- AutoYast是SUSE Linux Enterprise和OpenSUSE的自动化安装工具
- Ignition用于CoreOS和Flatcar Linux的初始配置工具
更强大的PXE Boot预启动执行环境(PXE)允许计算机通过网络启动,并从网络服务器下载操作系统和配置文件。其通常与Kickstart或Preseed配合使用,实现自动化安装和配置。
但是这些工具大多用于操作系统安装阶段的自动化,适用于数据中心或物理机/虚拟机部署场景,设计初衷并非针对云环境,即并非云原生。而cloud-init则是为云平台而生的,强调实例生命周期的初始化配置,并支持与云平台元数据服务(如EC2 meta-data)集成,实现更动态的配置流程。
值得一提的是,虽然cloud-init起初是为云环境设计的,但由于其通用性和灵活性,它也逐渐被用于传统虚拟机和服务器的自动化初始化任务中,不再局限于“云原生”场景。
0.初识cloud-init
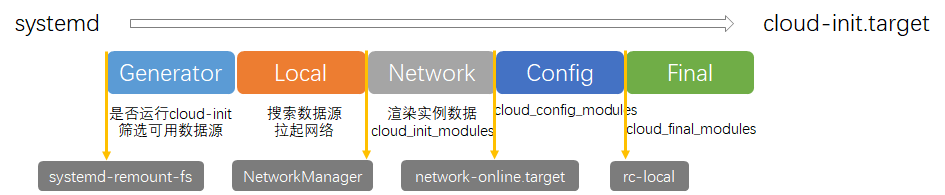
在整个系统启动的过程中,cloud-init的执行包括Generator、Local、Network、Config、Final,5个阶段。cloud-init支持很多模块真正的定制工作就是由这些模块完成,在cloud-init中cloud.cfg配置决定具体的模块可以在不包括Generator的4个阶段中的哪一个阶段运行,user-data包含定制化模块的具体参数,datasource告诉cloud-init从何处读取到user-data内容,源码内部cloud-init定义了统一的抽象类接口,所有的datasource实现都要按照规范实现这些接口。
以下是阿里云主机导出的cloud.cfg配置文件样例,其定义整个cloud-init过程各个阶段需要执行的相关动作及配置
# The top level settings are used as module
# and system configuration.

# A set of users which may be applied and/or used by various modules
# when a 'default' entry is found it will reference the 'default_user'
# from the distro configuration specified below
users:
   - default

user:
    name: root
    lock_passwd: False

# If this is set, 'root' will not be able to ssh in and they
# will get a message to login instead as the default $user
disable_root: false

# This will cause the set+update hostname module to not operate (if true)
preserve_hostname: false

manage_etc_hosts: localhost


apt:
    preserve_sources_list: true


datasource_list: [ AliYun ]

# Example datasource config
datasource:
    AliYun:
        support_xen: false
        timeout: 5
        max_wait: 300
#      metadata_urls: [ 'blah.com' ]

# The modules that run in the 'init' stage
cloud_init_modules:
 - migrator
 - source-address
 - pip-source
 - seed_random
 - bootcmd
 - write-files
 - [ growpart, once-per-instance ]
 - [ resizefs, once-per-instance ]
 - disk_setup
 - mounts
 - set_hostname
 - update_hostname
 - update_etc_hosts
 - ca-certs
 - rsyslog
 - users-groups
 - ssh

# The modules that run in the 'config' stage
cloud_config_modules:
# Emit the cloud config ready event
# this can be used by upstart jobs for 'start on cloud-config'.
 - emit_upstart
 - snap
 - snap_config  # DEPRECATED- Drop in version 18.2
 - ssh-import-id
 - locale
 - set-passwords
 - grub-dpkg
 - apt-pipelining
 - apt-configure
 - ubuntu-advantage
 - ntp
 - timezone
 - disable-ec2-metadata
 - runcmd
# - ntp-conf
# - chrony-conf
 - byobu

# The modules that run in the 'final' stage
cloud_final_modules:
 - snappy  # DEPRECATED- Drop in version 18.2
 - package-update-upgrade-install
 - fan
 - landscape
 - lxd
 - ubuntu-drivers
 - puppet
 - chef
 - mcollective
 - salt-minion
 - rightscale_userdata
 - scripts-vendor
 - scripts-per-once
 - scripts-per-boot
 - scripts-per-instance
 - scripts-user
 - ssh-authkey-fingerprints
 - keys-to-console
 - phone-home
 - final-message
 - power-state-change

# System and/or distro specific settings
# (not accessible to handlers/transforms)
system_info:
   # This will affect which distro class gets used
   distro: ubuntu
   paths:
      cloud_dir: /var/lib/cloud/
      templates_dir: /etc/cloud/templates/
      upstart_dir: /etc/init/
   ssh_svcname: ssh
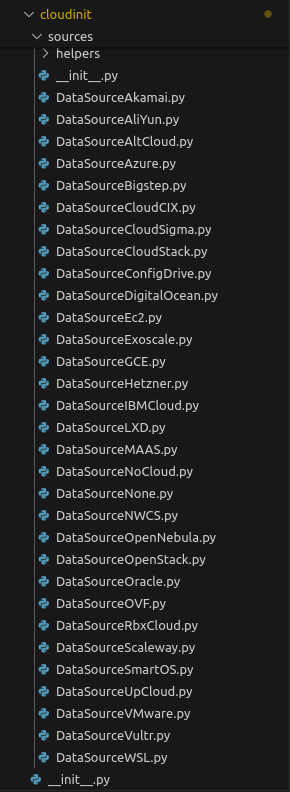
上图展示最新主干分支,cloud-init支持的数据源,可以看到常见的公有云厂商基本都已支持,私有云与虚拟化平台OpenStack,OpenNebula,CloudStack也支持,这里简单介绍一下比较特殊的本地与测试环境数据源,NoCloud,Config Drive,Fallback/None,还有虚拟化平台数据源VMware
- NoCloud,用于本地或测试环境,cloud-init从本地文件系统或ISO镜像中读取user-data和meta-data文件
- Config Drive,通过挂载的虚拟光驱提供配置信息,cloud-init从中读取初始化数据
- Fallback/None,当未检测到任何有效数据源时,使用此数据源,表示不进行任何初始化操作
- VMware虚拟化平台,可通过其提供的OVF环境变量获取配置信息,cloud-init读取环境变量获取数据源
- OVF开放虚拟化格式,可解析其中的环境变量进行配置,cloud-init读取环境变量获取数据源
具体使用什么数据源可以在默认配置cloud.cfg,或者定制化配置cloud.cfg.d目录中文件,内核参数中设置,其中内核参数优先级最高
Generator
当系统以systemd启动时,会运行一个生成器generator,用于判断是否应将cloud-init.target包含在启动目标boot goals中。默认情况generator会使能cloud-init服务,但是如果存在/etc/cloud/cloud-init.disabled文件或者内核启动参数/proc/cmdline包含cloud-init=disabled时不会启用cloud-init服务。当运行在容器中时,内核命令行参数不会生效,但cloud-init会改为读取一个名为KERNEL_CMDLINE的环境变量来代替,上述的这些关闭cloud-init服务的手段目前仅存在与systemd作为init进程的操作系统中。
注意:
该阶段的核心ds-identify是包含在cloud-init软件包中的一个辅助工具,位于/usr/lib/cloud-init/ds-identify,其在系统启动早期,识别当前实例是否在某种cloud-init支持的数据源环境中运行,并决定是否启用cloud-init,判断条件即前文所描述的相关内容。
root@iZbp1eigxxslyua75sn1ijZ:~# sudo DEBUG_LEVEL=2 DI_LOG=stderr /usr/lib/cloud-init/ds-identify --force
[up 42498838.34s] ds-identify --force
policy loaded: mode=search report=false found=all maybe=all notfound=disabled
/etc/cloud/cloud.cfg set datasource_list: [ AliYun ]
DMI_PRODUCT_NAME=Alibaba Cloud ECS
DMI_SYS_VENDOR=Alibaba Cloud
DMI_PRODUCT_SERIAL=8c781d55-1433-412b-b41e-1dae63868e25
DMI_PRODUCT_UUID=8C781D55-1433-412B-B41E-1DAE63868E25
PID_1_PRODUCT_NAME=unavailable
DMI_CHASSIS_ASSET_TAG=
FS_LABELS=/
ISO9660_DEVS=
KERNEL_CMDLINE=BOOT_IMAGE=/boot/vmlinuz-4.4.0-210-generic root=UUID=7479ab56-ec96-4543-be15-3be73ff79223 ro vga=792 console=tty0 console=ttyS0,115200n8 net.ifnames=0 noibrs nvme.io_timeout=4294967295 nvme.admin_timeout=4294967295 quiet
VIRT=kvm
UNAME_KERNEL_NAME=Linux
UNAME_KERNEL_RELEASE=4.4.0-210-generic
UNAME_KERNEL_VERSION=#242-Ubuntu SMP Fri Apr 16 09:57:56 UTC 2021
UNAME_MACHINE=x86_64
UNAME_NODENAME=iZbp1eigxxslyua75sn1ijZ
UNAME_OPERATING_SYSTEM=GNU/Linux
DSNAME=
DSLIST=AliYun
MODE=search
ON_FOUND=all
ON_MAYBE=all
ON_NOTFOUND=disabled
pid=11598 ppid=11597
is_container=false
single entry in datasource_list (AliYun) use that.
[up 42498838.38s] returning 0

root@iZbp1eigxxslyua75sn1ijZ:~# cloud-id
aliyun
结合前文的cloud.cfg以及ds-identify的相关运行信息,可以得出其确定使用AliYun数据源,获取dmi信息,内核相关信息,判断当前环境是否是容器环境,实际环境中ds-identify日志位于/run/cloud/ds-identify.log
Local
Local阶段通过cloud-init-local服务,实际执行cloud-init init --local命令。通过走读cloud-init源码,cloud-init的入口函数位于cmd/main.py文件的main方法,其处理完参数配置问题后,在status_wrapper函数中执行main_init函数,其源码如下图所示:
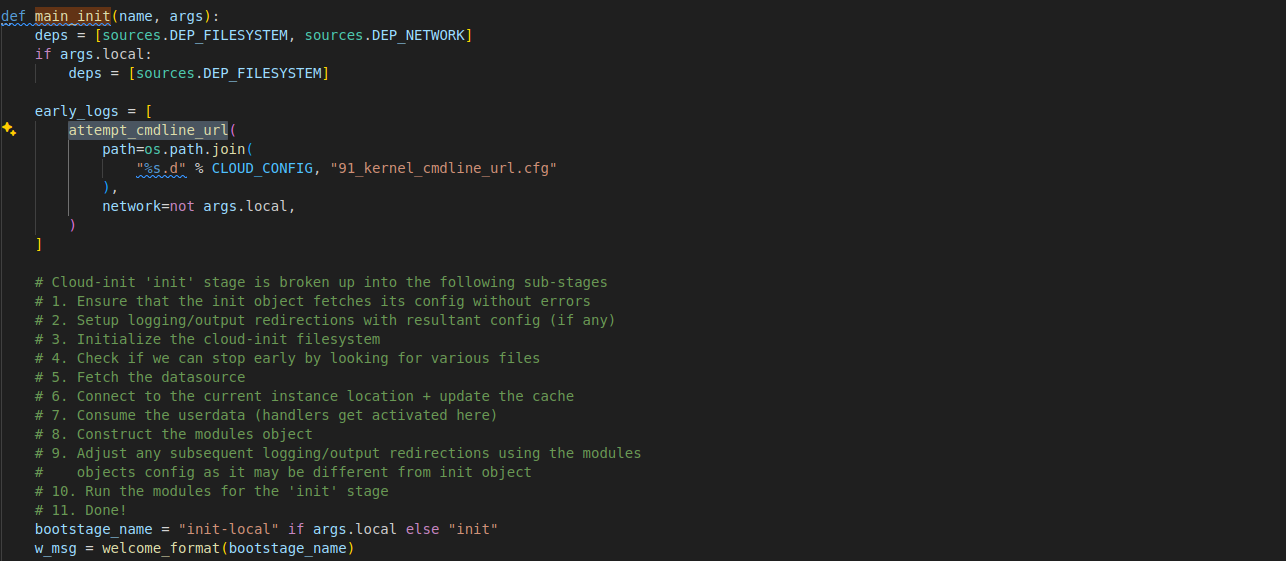
主要工作,在代码注释中以详细说明,这里不再赘述。这里强调一下关键步骤3,主要是初始化/var/lib/cloud/目录,清理旧数据,用来存储运行时数据(如缓存、实例元数据、用户数据等)和步骤4主要通过检查某些特定文件来判断是否提前终止cloud-init的初始化流程,因为cloud-init在首次启动时会执行完整的初始化流程如配置网络、安装软件等,但在后续重启时,某些操作可能已经完成,不需要重复执行,同时在该阶段步骤5会尝试读取datasource,首先从缓存读取,其次读取默认支持的本地datasource,该阶段最重要的是配置网卡启动网络服务,为后续读取meta-data,网络datasource做前置准备
实际上cloud-init通过本地缓存中的instance-id与数据源中获取的id来对比,确认是否是新建云主机第一次启动
Network
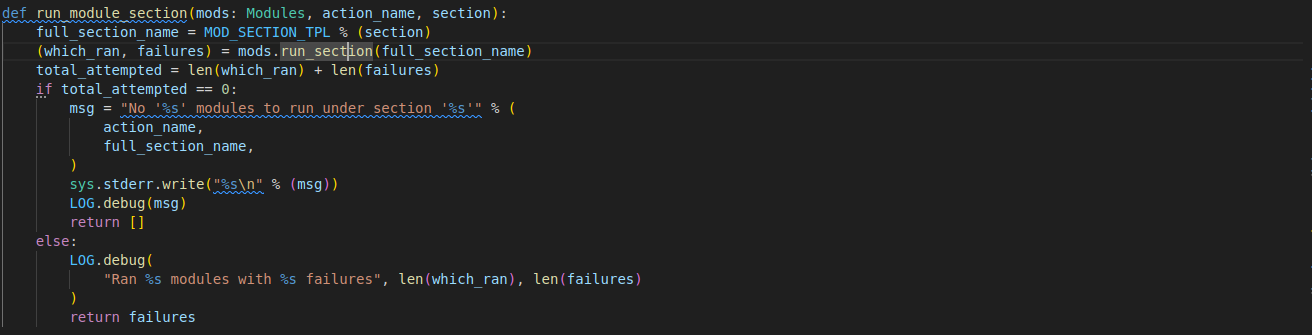
Network阶段通过cloud-init服务,执行命令cloud-init init,函数的执行入口是main_init函数,但此阶段functor并有被status_wrapper替换,此时默认会等待网络配置成功,不同的发行版本实现不同的网络配置方法,最后在run_module_section函数中结合user-data数据执行cloud.cfg配置文件中cloud_init_modules节所定义的模块
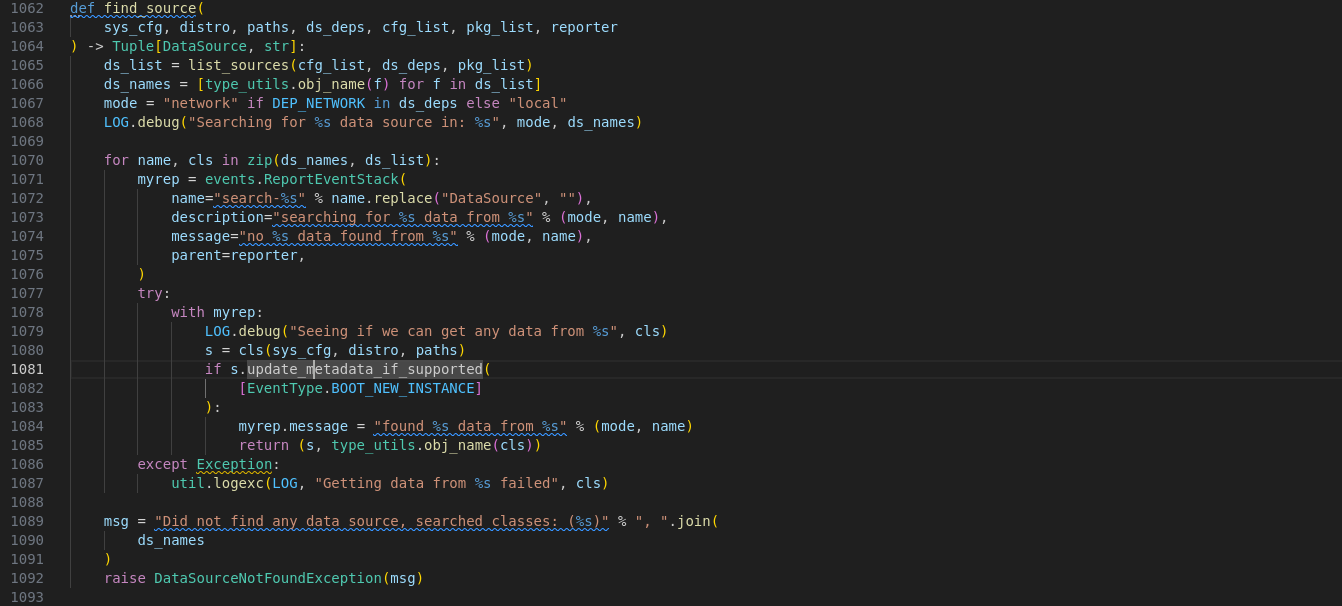
代码片段find_source展示包括local阶段在内cloud-init如何遍历可用的datasource获取数据的流程
Config
Config阶段通过cloud-config服务,执行命令cloud-init modules -mode config,modules子命令的核心入口函数main_modules处理相关逻辑,在此阶段运行对其他阶段实际上没有影响的模块,执行cloud.cfg配置文件中cloud_config_modules节所定义的模块
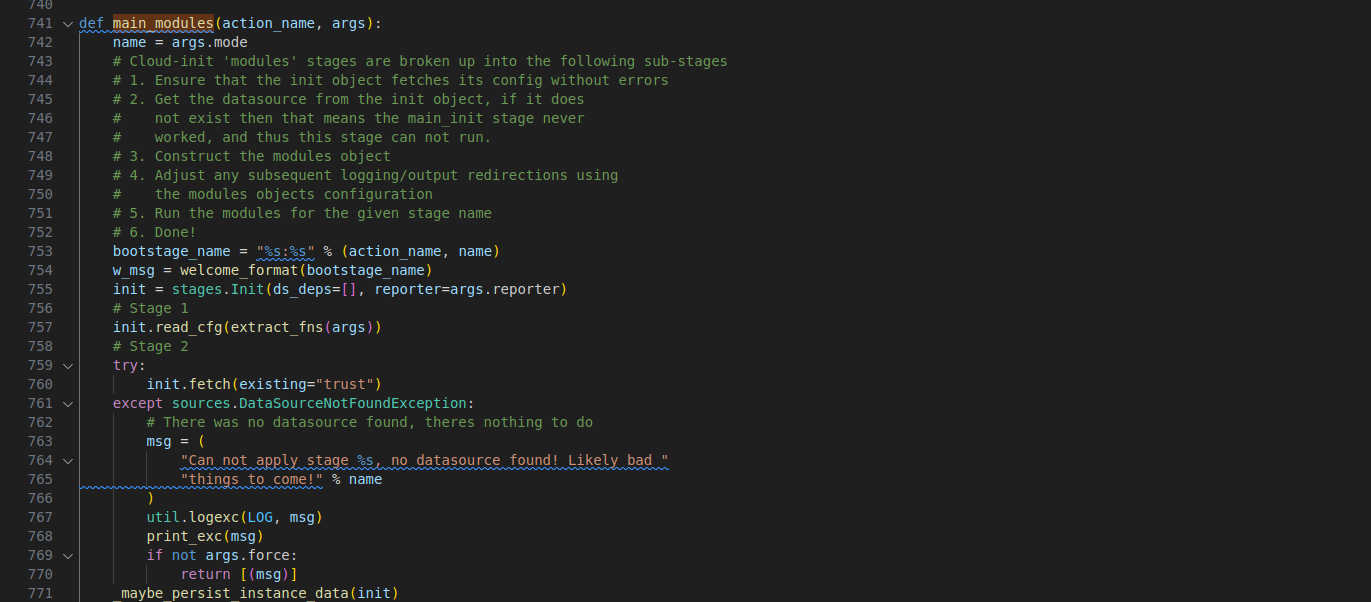
其运行过程分解成5个子步骤,主要工作还是从datasource中获取相关配置,初始化在该阶段运行的模块,最后调用模块的run_modules方法执行操作
Final
Final阶段通过cloud-final服务,执行命令cloud-init modules -mode final,和Config阶段一样,核心入口函数main_modules,执行cloud.cfg配置文件中cloud_final_modules节所定义的模块,任何用户习惯在登录系统后运行的脚本,在这个阶段都应该能正确运行,比如软件包安装,配置管理插件(如Puppet、Chef、Salt Minion),用户脚本(包括 runcmd)
1.配置编写
cloud-init的运行流程主要围绕user-data,meta-data,vendor-data三个核心文件展开,vendor-data,meta-data,user-data依次加载,最后加载的user-data,在配置冲突时会覆盖前两者
- meta-data: 提供实例的元信息(如主机名、实例ID、网络基础配置),通常由云平台(如AWS、OpenStack)自动生成,但也可手动覆盖
- vendor-data: 定义云厂商或平台提供的默认配置(如预装软件、基线安全策略)
- user-data: 定义实例个性化配置,如用户创建、软件安装、脚本执行,通常由DevOps团队编写
编写user-data文件主要参考cloud-init模块文档
1.1user-data
用户数据的格式可以分为两大类,一类直接配置实例的格式,另一类用作容器(承载其他实例格式)、模板(jinja引用meta-data变量),或用于获取/修改其他配置的格式(指include类型的user-data)
直接配置实例格式
- data类型
data类型是推荐的user-data格式,注意shebang的形式。该格式在YAML1.1中使用声明式语法描述实例状态。cloud config data类型可以使用jinja模板,相关变量定义于meta-data文件中,比如这里的hostname配置。使用模板引用meta-data变量时需要在首行添加指示性注释。
## template: jinja
#cloud-config

users:
  - root
hostname: {{ hostname }}
ssh_pwauth: true
disable_root: false
ssh_import_id: ['gh:ewall-cauc']
timezone: Asia/Shangha
chpasswd:
  expire: true
  users:
  - {name: root, type: RANDOM}
apt:
  preserve_sources_list: false
  primary:
    - arches:
      - amd64
      - i386
      - default
      uri: https://repo.huaweicloud.com/ubuntu
package_reboot_if_required: false
package_update: true
packages:
  - net-tool
runcmd:
  - sed -i -e '/^#PermitRootLogin/s/^.*$/PermitRootLogin yes/' /etc/ssh/sshd_config
  - sed -i -e '/^#PasswordAuthentication/s/^.*$/PasswordAuthentication yes/' /etc/ssh/sshd_config
  - systemctl restart sshd
- script类型
和data类型一样,该类型也可以使用jinja模板,相关变量定义于meta-data文件中。使用virt-customize工具可以将user-data,meta-data文件合入镜像文件,在后续过程中使用本地的datasource运行cloud-init。(GRUB_CMDLINE_LINUX=“ds=nocloud;s=file:///root/"),观察script类型shebang和data类型的区别
sudo virt-customize -a jammy-server-cloudimg-amd64.img --root-password password:123456 #提前设置用户密码
sudo virt-customize -a jammy-server-cloudimg-amd64.img --copy-in ./meta-data:/root/ --copy-in ./user-data:/root

#!/bin/sh
echo "Hello World. The time is now $(date -R)!" | tee /root/output.txt
- boothook类型
boothook类型和script类型相似都是在启动阶段运行定义脚本,但其系统启动过程中最早的阶段运行。与其他配置类型相比,boothook是在实例启动的早期阶段(甚至在cloud-config配置之前)执行的。这使得它非常适合执行一些关键的启动任务,如磁盘挂载、网络配置、系统设置等。一般没有机制保证只执行一次
#cloud-boothook
#!/bin/sh

cloud-init-per instance do-hosts /bin/false && exit 0 # 保证一个实例只执行一次下面语句

echo 192.168.1.130 us.archive.ubuntu.com > /etc/hosts
其他配置类型
- gzip类型
cloud-init对user-data内容限制在16384字节,但允许用户使用gzip格式对user-data进行压缩,系统初始化过程自动解压
gzip user-data > user-data.gz
- mime类型
mime类型文件允许用户在一个文件中包含多个部分,每个部分都可以有不同的内容类型。对于cloud-init来说,这意味着用户可以在一个配置文件中包含多个配置部分,每个部分可以是不同类型的数据。cloud-init子命令提供辅助功能,帮助用户生成mime multi part archive类user-data。比如下面的例子,将config.yaml文件的cloud-config类型(data类型)和script.sh的script类型整体打包
cloud-init devel make-mime --list-types
输出:
    cloud-boothook
    cloud-config
    cloud-config-archive
    cloud-config-jsonp
    jinja2
    part-handler
    x-include-once-url
    x-include-url
    x-shellscript
    x-shellscript-per-boot
    x-shellscript-per-instance
    x-shellscript-per-onc

cloud-init devel make-mime -a config.yaml:cloud-config -a script.sh:x-shellscript
输出:
    Content-Type: multipart/mixed; boundary="===============0694022250998506939=="
    MIME-Version: 1.0
    --===============0694022250998506939==
    Content-Type: text/cloud-config; charset="utf-8"
    MIME-Version: 1.0
    Content-Transfer-Encoding: base64
    Content-Disposition: attachment; filename="config.yaml
    I2Nsb3VkLWNvbmZpZwoKc3NoX3B3YXV0aDogdHJ1ZQpkaXNhYmxlX3Jvb3Q6IHRydWUKY2hwYXNz
    d2Q6CiAgZXhwaXJlOiB0cnVlCiAgdXNlcnM6CiAgLSB7bmFtZTogcm9vdCwgdHlwZTogUkFORE9N
    fQoKc3NoX2ltcG9ydF9pZDogWydnaDpld2FsbC1jYXVjJ10KdGltZXpvbmU6IEFzaWEvU2hhbmdo
    YWkKCmFwdDoKICBwcmVzZXJ2ZV9zb3VyY2VzX2xpc3Q6IGZhbHNlCiAgcHJpbWFyeToKICAgIC0g
    YXJjaGVzOgogICAgICAtIGFtZDY0CiAgICAgIC0gaTM4NgogICAgICAtIGRlZmF1bHQKICAgICAg
    dXJpOiBodHRwczovL3JlcG8uaHVhd2VpY2xvdWQuY29tL3VidW50dS8KCnBhY2thZ2VfcmVib290
    X2lmX3JlcXVpcmVkOiBmYWxzZQpwYWNrYWdlX3VwZGF0ZTogdHJ1ZQpwYWNrYWdlczoKICAjIC0g
    Z2NjCiAgIyAtIGdkYgogICMgLSBnb2xhbmcKICAjIC0gdmFsZ3JpbmQKICAjIC0gY2xhbmcKICAj
    IC0gY2xhbmctZm9ybWF0CiAgLSBqcQogICMgLSBuZXQtdG9vbHMKCnJ1bmNtZDoKICAtIHNlZCAt
    aSAtZSAnL14jUGVybWl0Um9vdExvZ2luL3MvXi4qJC9QZXJtaXRSb290TG9naW4geWVzLycgL2V0
    Yy9zc2gvc3NoZF9jb25maWcKICAtIHNlZCAtaSAtZSAnL14jUGFzc3dvcmRBdXRoZW50aWNhdGlv
    bi9zL14uKiQvUGFzc3dvcmRBdXRoZW50aWNhdGlvbiB5ZXMvJyAvZXRjL3NzaC9zc2hkX2NvbmZp
    ZwogIC0gc3lzdGVtY3RsIHJlc3RhcnQgc3NoZAo
    --===============0694022250998506939==
    Content-Type: text/x-shellscript; charset="utf-8"
    MIME-Version: 1.0
    Content-Transfer-Encoding: base64
    Content-Disposition: attachment; filename="script.sh
    IyEvYmluL3NoCmVjaG8gIkhlbGxvIFdvcmxkLiAgVGhlIHRpbWUgaXMgbm93ICQoZGF0ZSAtUikh
    IiB8IHRlZSAvcm9vdC9vdXRwdXQudHh0Cg=
    --===============0694022250998506939==-
- include类型
include file类型由一组URL列表组成。每个URL的内容将被读取,并通过相同的规则处理,即从URL读取的内容可以是gzipped(压缩的)、MIME多部分或纯文本。注意如果读取文件时发生错误,剩余的文件将不会被读取。
#include

https://cloud.init.diyao.me/config/cloud-img/
- archive类型
由于手动构建MIME多部分归档文件可能比较繁琐,或者需要使用cloud-init辅助工具,cloud-config-archive提供了一种更简单的替代方式,通过YAML格式包含多种配置类型
#cloud-config-archive
- type: "text/cloud-boothook"
  content: |
    #!/bin/sh
    echo "this is from a boothook." > /var/tmp/boothook.txt
- type: "text/cloud-config"
  content: |
    bootcmd:
    - echo "this is from a cloud-config." > /var/tmp/bootcmd.txt
1.2meta-data
下面的meta-data来自官方样例(/usr/share/doc/cloud-init/examples/seed/meta-data),该配置是aws云主机的配置案例,很多专用字段,其核心字段instance-id,标注实例id
# this is yaml formatted data
# it is expected to be roughly what you would get from running the following
# on an ec2 instance:
# python -c 'import boto.utils, yaml; print(yaml.dump(boto.utils.get_instance_metadata()))'
ami-id: ami-fd4aa494
ami-launch-index: '0'
ami-manifest-path: ubuntu-images-us/ubuntu-lucid-10.04-amd64-server-20100427.1.manifest.xml
block-device-mapping: {ami: sda1, ephemeral0: sdb, ephemeral1: sdc, root: /dev/sda1}
hostname: domU-12-31-38-07-19-44.compute-1.internal
instance-action: none
instance-id: i-87018aed
instance-type: m1.large
kernel-id: aki-c8b258a1
local-hostname: domU-12-31-38-07-19-44.compute-1.internal
local-ipv4: 10.223.26.178
placement: {availability-zone: us-east-1d}
public-hostname: ec2-184-72-174-120.compute-1.amazonaws.com
public-ipv4: 184.72.174.120
public-keys:
  ec2-keypair.us-east-1: [ssh-rsa AAAAB3NzaC1yc2EAAAADAQABAAABAQCD9dlT00vOUC8Ttq6YH8RzUCVqPQl6HaSfWSTKYnZiVCpTBj1CaRZPLRLmkSB9Nziy4aRJa/LZMbBHXytQKnB1psvNknqC2UNlrXXMk+Vx5S4vg21MXYYimK4uZEY0Qz29QUiTyNsx18jpAaF4ocUpTpRhxPEBCcSCDmMbc27MU2XuTbasM2NjW/w0bBF3ZFhdH68dZICXdTxS2jUrtrCnc1D/QXVZ5kQO3jsmSyJg8E0nE+6Onpx2YRoVRSwjpGzVZ+BlXPnN5xBREBG8XxzhNFHJbek+RgK5TfL+k4yD4XhnVZuZu53cBAFhj+xPKhtisSd+YmaEq+Jt9uS0Ekd5
      ec2-keypair.us-east-1, '']
reservation-id: r-e2225889
security-groups: default

# of the fields above:
# required:
#  instance-id
# suggested:
#  local-hostname
#  public-keys
debug2: channel 0: window 998410 sent adjust 50166
1.3验证
sudo cloud-init schema --system --annotate
cloud-init schema -c test.yml --annotate  # 验证指定test.yml文件
1.修改内核参数指定datasource
qemu-system-x86_64                                                        \
  -device e1000,netdev=eth0                                               \
  -netdev user,id=eth0,dns=8.8.8.8,hostfwd=tcp::22222-:22                 \
  -machine accel=kvm:tcg                                                  \
  -cpu host                                                               \
  -m 2048                                                                 \
  -nographic                                                              \
  -hda jammy-server-cloudimg-amd64.img                                    \
  -smbios type=1,serial=ds='nocloud-net;s=https://cloud.init.diyao.me/config/cloud-img/'
# 使用内核参数也可以达到相同效果,s表示seedfrom
  -append "root=/dev/sda1 console=ttyS0 ds=nocloud-net;s=https://cloud.init.diyao.me/config/cloud-img/"
运行过程中qemu会自动将生成的iso文件挂载至/media目录,同时附加cidata标签,(A labeled vfat or iso9660 filesystem may be used. The filesystem volume must be labelled CIDATA)这里虽然没有指定内核参数,但是cloud-init运行时默认会读取/etc/cloud/cloud.cfg.d/90_dpkg.cfg,该文件定义了默认的datasource搜索顺序,nocloud优先
genisoimage -output seed.iso -volid cidata -rational-rock -joliet user-data meta-data network-config
# 下面的cloud-localds效果相同
apt install cloud-image-utils
cloud-localds seed.iso user-data meta-data

qemu-system-x86_64                                          \
  -m 1024                                                   \
  -device e1000,netdev=eth0                                 \
  -netdev user,id=eth0,dns=8.8.8.8,hostfwd=tcp::22222-:22   \
  -hda jammy-server-cloudimg-amd64.img                      \
  -nographic                                                \
  -hdb seed.iso
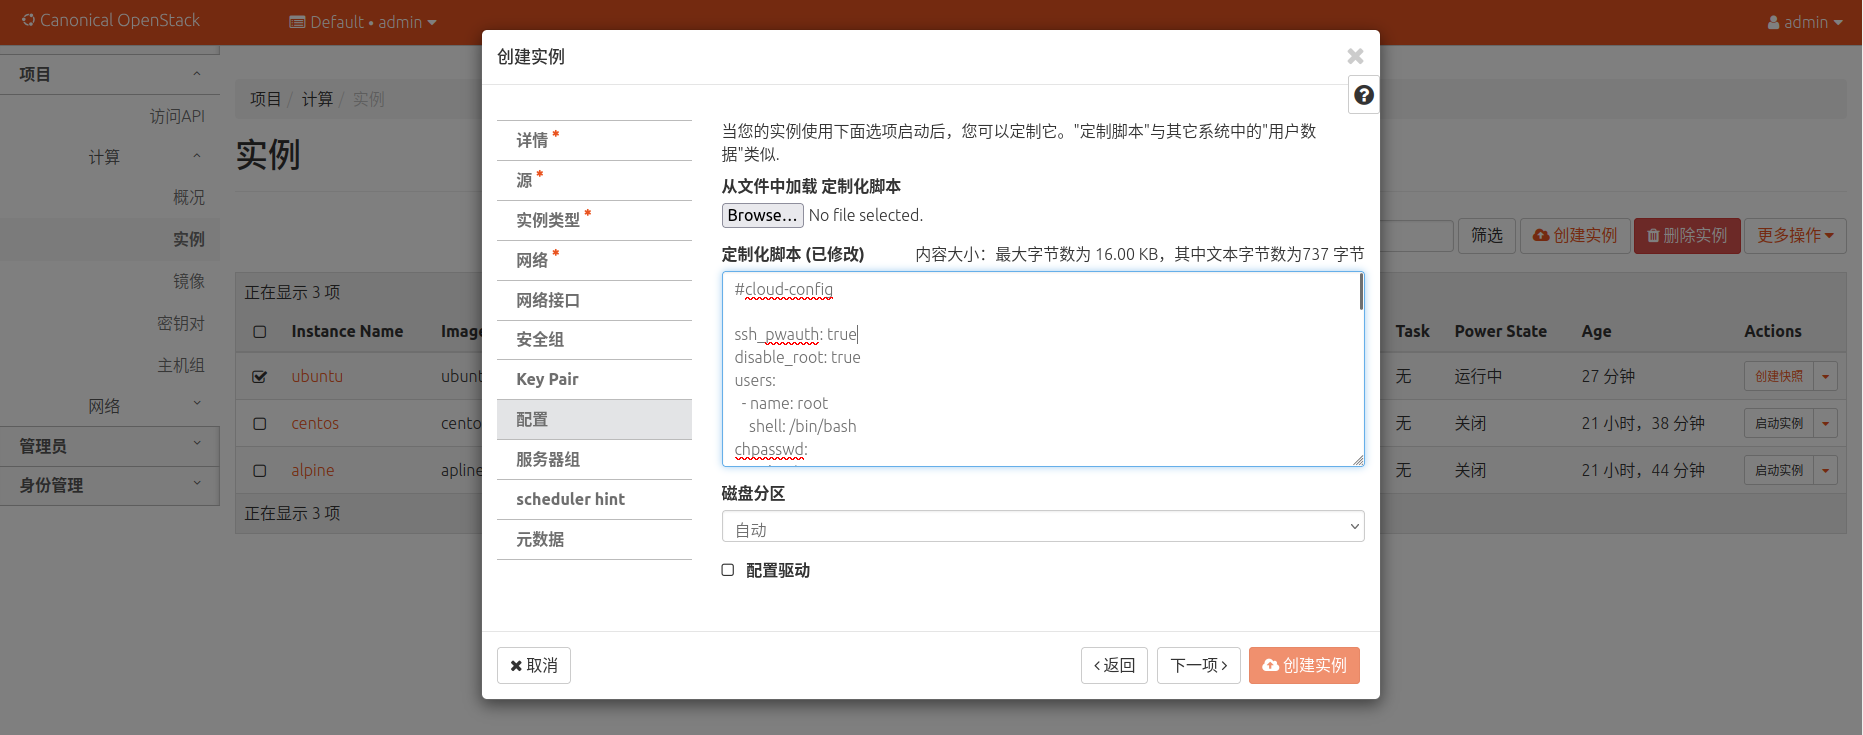
2.openstack设置user-data
创建openstack实例时,通过添加user-data信息,在实例创建时增加自定义的操作,完成软件安装,主机设置等
2.高级技巧
cloud-init调试
- cloud-init clean –logs –reboot 清除日志缓存, 重启系统再次运行cloud-init
- sudo cloud-init single –name cc_ssh –frequency always 单模块调试运行
- 按阶段调试cloud-init运行 cloud-init init –local | cloud-init init | loud-init modules –mode=config | cloud-init modules –mode=final
- 使用cloud-id工具,判断当前实例运行环境,比如阿里云主机返回aliyun云提供商名称。
- cloud-init schema –config-file user-data –annotate # 验证配置是否正确
变更模块频次
phone_home模块情况每实例运行一次(once-per-instance), 修改/etc/cloud/cloud.cfg将该模块每次开机运行:
cloud_final_modules:
  - [phone_home, always]
  - final_message
  - power_state_change